Implementing PHP localization: A complete guide |
您所在的位置:网站首页 › implement php › Implementing PHP localization: A complete guide |
Implementing PHP localization: A complete guide
|
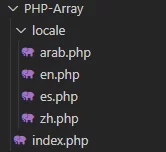
In this tutorial, we are going to discuss how to implement PHP translation/localization/internationalization. PHP is quite a stable and popular choice for web application development. Despite the existence of many other programming languages such as Python, Ruby, and Node.js, a large number of applications are still built using flat PHP without any framework. Therefore, learning PHP localization techniques is undoubtedly useful for web developers. Okay, first off let’s briefly discuss what localization (l10n) is and why it is such a common task among developers. Localization in software engineering is the process of adapting the content of a system to a particular locale so the target audience in that locale can understand it. It is not just about changing content from one language to another. You have to take date formats, number formats, currencies, text direction, and proper pluralization into account as well. For more information, here is our ultimate guide on software localization. As an example, you may know that pluralization is comparatively easy in English versus other languages. However, in some languages such as Slavic ones, there are two plural forms for a given singular one. Likewise, the date, time, and number formatting in some languages can differ significantly from those used in English. So, now you will understand that we have to consider multiple things in PHP translation besides simple language switching. Let’s move on to discover how we can implement PHP l10n – in this tutorial, we will cover the following five ways to achieve this: PHP arraysGettextDefine statement in PHPSetlocaleFrameworksI have developed a small application using the example code snippets in this article. You can find it on GitHub. PHP arraysThis is the primitive method that has been used to implement PHP translation for a long time. For this, you need to create an associative array for each language. These arrays are used to map the source language or keys to localized content. When you need to view localized content, you simply have to select the array and key of the relevant language. Plain text translation with PHP arraysLet’s take a look at an example. In this, we will implement localization for four languages: English, Arabic, Chinese, and Spanish. Please note that we are using English as the base language as it’s the primary language of most systems and applications. Here we will use a separate PHP file for each array to increase readability. However, if you like, you can use the same file to store all the arrays. Let’s see how we can display the sentence “Welcome to the tutorial” with PHP arrays in the languages mentioned above. First, you need to have a file structure as shown here:
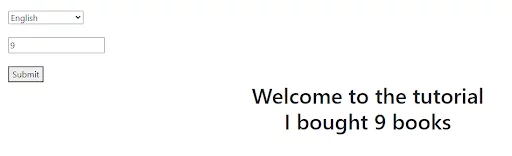
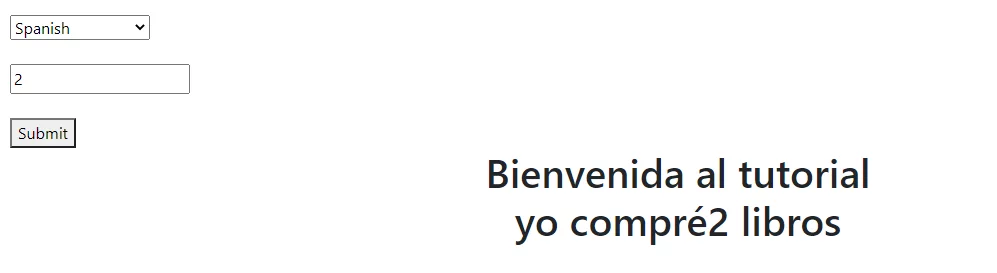
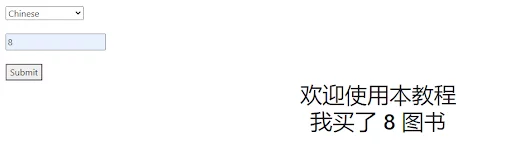
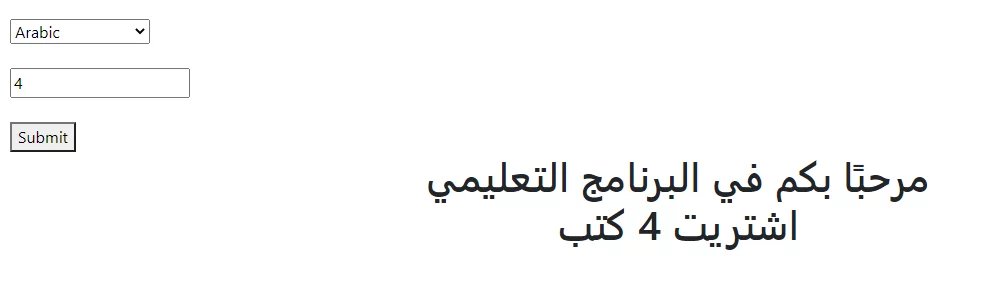
Note that arab, en, es, zh are the locale codes for the Arabic, English, Spanish, and Chinese languages, respectively. In the index.php file, create a simple form that includes a dropdown in order to ensure the user can easily select languages. PHP-Array/index.php file Select Language Arabic Chinese English Spanish SubmitNow let’s create our translation files for the four languages in the locale folder. PHP-Array/locale/en.php PHP-Array/locale/zh.php PHP-Array/locale/arab.php PHP-Array/locale/es.php Here we have created an array called langArray and mapped the key to the appropriate string in all four of our languages. Next, we’ll go back to our index.php file in the PHP-Array folder and make it display the “welcome to the tutorial” line. The language of the content should be changed according to the language the user selects from the dropdown. To do this, let’s add the following PHP code snippet to the index.php file. What we have done here is get the selected language’s code and import that particular translation file. Finally, we got the content of the ‘welcome’ key from the imported file. Okay, I hope that is super easy. Now let’s check out how we can perform pluralization with PHP arrays. Pluralization with PHP arraysAssume that you need to display sentences such as, “I bought 1 book”, “I bought 4 books”, “I bought 10 books”, etc. You can see here the word is book or books, depending on the number of books we are adding. To achieve this, we’ll create a text box to input the number of books as below: We can successfully perform this pluralization by simply adding the following part to the index.php file in the root folder: if (!isset($_GET['numBooks'])) $numberOfBooks = 1; else $numberOfBooks = (int) $_GET['numBooks']; if ($numberOfBooks == 1) { $sentence = sprintf($langArray['i_bought_single_book'], $numberOfBooks); } else if ($numberOfBooks > 1) { $sentence = sprintf($langArray['i_bought_many_books'], $numberOfBooks); } else { $sentence = $langArray['i_bought_no_books']; } echo ''; echo $sentence;This is a very clear code that everyone can understand. If the number of books is one, it refers to the ‘single_book’ key in the langArray array, and if not, it refers to the ‘many_books’ key in the langArray. Then we need to add those keys in our translation files like so: PHP-Array/locale/en.php file $langArray = array( 'i_bought_single_book' => 'I bought a book.', 'i_bought_many_books' => 'Books bought: %d.', 'i_bought_no_books' => 'I didn\'t buy any books.', );PHP-Array/locale/zh.php file $langArray = array( 'i_bought_single_book' => '我买了一本书.', 'i_bought_many_books' => '买书: %d.', 'i_bought_no_books' => '我没买书.', );PHP-Array/locale/es.php file $langArray = array( 'i_bought_single_book' => 'Compré un libro.', 'i_bought_many_books' => 'Libros comprados: %d.', 'i_bought_no_books' => 'No compré ningún libro.', );PHP-Array/locale/arab.php file $langArray = array( 'i_bought_single_book' => 'شتريت كتابًا', 'i_bought_many_books' => '%d شترى الكتب', 'i_bought_no_books' => 'م أشتري أي كتب', );The following images are the outputs of the above code when the user selects different languages and inputs a number of books:
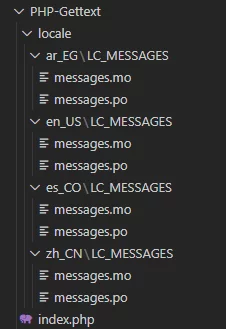
As you have seen in the first section, PHP translation using arrays is quite straightforward. But as the system expands, it can be hard to maintain translation arrays. The GNU gettext system is a widely used localization method in many programming languages such as PHP, Python, C++, and so on. In this section, we’ll look at how we can use the gettext technique for PHP translation. With gettext, it is very easy to sync locale files with changes to the codebase. Now, let’s make another small application to illustrate PHP localization with gettext. Before using gettext, you need to follow a few steps, as mentioned in the manual, to set it up. Firstly, create a separate folder for gettext localization implementation to avoid any possible confusion. I have named the folder PHP_Gettext here. Then, we create a file named index.php within our PHP_Gettext folder. Next, we need to create the locale folders in the same PHP_Gettext folder and these should include messages.po and messages.mo files for each locale as follows:
You may wonder what .po and .mo files are. A .po is a portable object file. These files are saved in a human-readable format. In the context of gettext, all translations are stored in .po files. All you have to add are key-value pairs in the same way as shown in the PHP array section. Translate plain textIt’s time to find out how to edit the index.php file in the PHP_Gettext folder. We will make an HTML form that includes a dropdown with the four languages (English, Spanish, Arabic, and Chinese). Users can select any language from this menu, thus converting the content into different languages with ease. Select Language Arabic Chinese English Spanish SubmitNote that we have used locales as the value of each option here. Next, we’ll need to create a PHP code in order to change the content between locales. This code snippet contains important features to discuss. The first part is similar that in the PHP array localization section and what it does is take the locale code related to the user-selected language and pass it to PHP code. So, next putenv() the function sets the environment variable of the LANG variable. Then the setlocale() method was employed to set the locale. Next, we used the bindtextdomain() function and passed the folder name and the domain name as parameters. This function sets the path for a given domain. The textdomain() function was used to set the default domain. Finally, we employed the gettext() function to look up a message in the given domain. Remember that _() is equal to gettext() in PHP translation. Let’s find out how to create the translation files – it’s quite straightforward. All you have to do is add the msgid and msgstr key and value pairs to the file as shown below. PHP_Gettext/locale/en_US/LC_MESSSAGES\messages.po file msgid "welcome" msgstr "Welcome to the tutorial" msgid "i_bought" msgstr "I bought " msgid "her_birthday" msgstr "Her birthday" msgid "now_time" msgstr "Current time"PHP_Gettext/locale/ar_EG/LC_MESSSAGES\messages.po file msgid "welcome" msgstr "مرحبًا بكم في البرنامج التعليمي" msgid "i_bought" msgstr " اشتريت" msgid "her_birthday" msgstr "عيد ميلادها" msgid "now_time" msgstr "الوقت الحالي"PHP_Gettext/locale/es_CO/LC_MESSSAGES\messages.po file msgid "welcome" msgstr "Bienvenida al tutorial" msgid "i_bought" msgstr " yo compré" msgid "her_birthday" msgstr "Su cumpleaño" msgid "now_time" msgstr "hora actual "PHP_Gettext/locale/zh_CN/LC_MESSSAGES\messages.po file msgid "welcome" msgstr " 欢迎使用本教程" msgid "i_bought" msgstr "我买了 " msgid "her_birthday" msgstr "她的生日 " msgid "now_time" msgstr "当前时间 "You can see in the file structure that we created a file within each locale called messages.mo. The .mo here stands for machine object. This file should contain the compiled version of the messages.po file. You can compile the messages.po file by executing the following command: msgfmt messages.po -o messages.mo If you check the content of the messages.mo file after compiling, you should be able to see unreadable binary content like this:
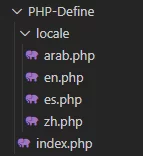
Here we’ll discuss how we can perform pluralization with gettext. First, let’s create our translation file contents by adding msgid and msgid_plural to the translation files as follows: PHP_Gettext/locale/en_US/LC_MESSSAGES\messages.po msgid "single_book" msgid_plural "many_books" msgstr[0] "book" msgstr[1] "books"PHP_Gettext/locale/es_CO/LC_MESSSAGES\messages.po msgid "single_book" msgid_plural "many_books" msgstr[0] "libro" msgstr[1] "libros"PHP_Gettext/locale/ar_EG/LC_MESSSAGES\messages.po msgid "single_book" msgid_plural "many_books" msgstr[0] "كتاب" msgstr[1] "كتب"PHP_Gettext/locale/zh_CN/LC_MESSSAGES\messages.po msgid "single_book" msgid_plural "many_books" msgstr[0] "书" msgstr[1] "图书"And so, we are done with our translation files. Next, let’s discuss how we can use this in the code. In the PHP_Gettext/index.php file, create a text box to get the user’s input using an HTML code and then use that input in the PHP translation. if (!isset($_GET['numBooks'])) $numberOfBooks = 1; else $numberOfBooks = $_GET['numBooks']; echo $numberOfBooks." ".ngettext('single_book', 'many_books', $numberOfBooks);Please note that Gettext doesn’t have any tools for working with number, currency, and date/time formats. The Define statement in PHPSo far, we have talked about two different methods of PHP translation: PHP arrays and Gettext. In this section, we are going to learn how we can perform PHP localization with the Define statement. This is a simple and straightforward method – let’s find out how we can implement it. To do this, we will create a folder named PHP-Define. In that folder, create another folder called locale. The folder structure is as follows:
Let’s define the translation files in this folder like so: PHP_Define/locale/en.php PHP_Define/locale/es.php PHP_Define/locale/zh.php PHP_Define/locale/arab.php So, let’s use this in the code. This will display content in the user-selected language. Please note that use of the HTML code is similar to that mentioned in previous sections. This is a very clear method for PHP translation. What we have done here is simply include the translation file based on the user’s language selection. Let’s see the output of this method.
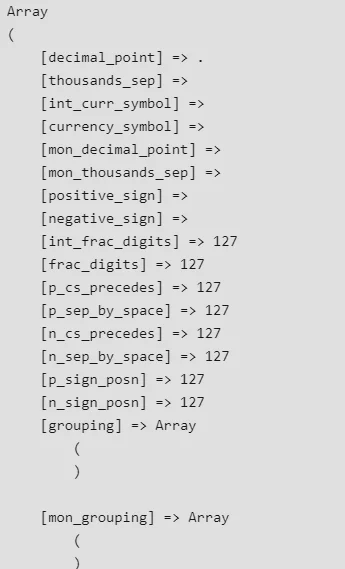
setlocale is an inbuilt function that supports PHP l10n. This assigns your system a geographical location and performs certain functions such as content translation and currency and date formatting, based on the locale of that place. The syntax of this method is: setlocale( $category , $locale ) As you can see, this method accepts two parameters. The first one is the category and the second one is the locale. The category is a constant that specifies the category of the functions. There are multiple categories that you can use depending on the functionality you need. Let’s discuss a few of those categories. LC_ALL – for all of the belowLC_COLLATE – for string comparisonLC_CTYPE – for character classification and conversionLC_MONETARY – for monetary/currency formattingLC_NUMERIC – for numeric formattingLC_TIME – for date and time formatting with strftime()LC_MESSAGES – for system responsesNow let’s discuss how we can use the setlocale method in PHP for localization. We’ll create another folder called PHP-Setlocale into which we’ll place our code and create a index.php file inside this folder. Date formatsAs we know, date formats can change depending on locale. So, it is important to consider the locale when displaying date formats. Before using locales, make sure that you have installed the required locale on your machine. You can check the locales you currently have installed by using the following command: locale -a Then we need to change the locale according to the user-selected language. For that, you can use the below code snippet in the index.php file in the PHP-Setlocale folder: if ($lang === 'en'){ setlocale(LC_ALL,"en_US"); }elseif ($lang === 'es'){ setlocale(LC_ALL,"es_CO"); }elseif( $lang === 'arab'){ setlocale(LC_ALL,"ar_EG"); }else{ setlocale(LC_ALL,"zh_CN"); }Here, $lang is the language code we initialized in the beginning. So, we have changed the locale with the setlocale() method according to the selected language. Please note that, if the locale that you need to use is not already installed on the machine, the setlocale method returns false. You can use this return value to identify whether or not the given locale is installed. Once we have set the required locale, we need to display the time and date. To do this, we will use strftime method. In this scenario, we will display two dates. Here we can use any format the user needs. The formats we have used in the above code snippet are the following: %m — month (01 to 12).%d — day of the month (01 to 31).%Y — year including the century.%X — preferred time representation without the date.So that’s how we can change date formats with setlocale i10n in PHP. Currency formattingCurrency formatting is an important feature that PHP offers. Let’s go through a simple code snippet that uses currency formatting based on locale in PHP. Here we have used the LC_MONETARY category and the localeconv function. This function is used to obtain numeric formatting information. From this, we can get all the information relating to the currency of a particular locale like so:
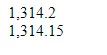
Now let’s look at a real-world use of the currency formatter. $number = 12000; setlocale(LC_MONETARY, 'en_US'); echo money_format('%i', $number)The output of this code is USD 1,200.00 Likewise, you can change the locale of your code and format currency as required. Please note that the money_format method is only defined if the system has strfmon capabilities. Therefore, you can’t use money_format in Windows as it doesn’t have strfmon capabilities. Number formattingNow let’s discover how to perform number formatting in PHP with setlocale. Take a look at the following code: $num = 1314.15; setlocale(LC_ALL, 'en_US'); echo number_format($num, 1); echo ""; echo number_format($num, 2);The number_format function takes two parameters. The first one is the number that should be displayed, and the other parameter is the number of digits after a decimal point. This is the output of the above code:
Nowadays, most developers use frameworks in order to make development quick and easy. So, let’s briefly discuss the localization support that is provided by frameworks. Actually, almost all major PHP frameworks support PHP translation. Moreover, some even support features such as currency and date formatting. Here we are not going to have an in-depth discussion on how to implement PHP localization with frameworks. So, we’ll briefly look at the methods these frameworks use for localization. The CodeIgniter and Kohana frameworks use PHP arrays for localization. The CakePHP framework uses the Gettext method for translation. Both PHP arrays and INI techniques are used in the F3 framework for localization. The Zend framework uses several methods for translation such as PHP arrays, CSV, TBX/TMX, gettext, Qt, XLIFF, and INI. These methods as introduced by the frameworks can easily be used for l10n in PHP. Note, however, that you may load only internationalization modules from your favourite framework and use it in your pure PHP application. So, ultimately the choice is yours. What is the best method for PHP localization?In this tutorial, we discussed multiple localization techniques we can use in PHP. So, let’s see which one of them is the best. There are so many open questions in Stack Overflow regarding the best technique for PHP localization. The majority of PHP developers hold the opinion that Gettext is the best method of localization. In the gettext method, you separate the translation text from the code. So, if you want to change the translation text, all you have to do is change the .po file without touching the code. Gettext is also very commonly used and has built-in support in PHP. Even WordPress uses the GNU gettext method for providing localized translations. However, it will not be easy to internationalize a whole application using Gettext alone. You will need the other methods mentioned here and intl as well. Anyway, developing large applications without using a PHP framework is very rare these days. So when, you select a framework, make sure to consider the localization methods it uses. Simplifying the translation process with LokaliseDeveloping an application including internationalization is easy with the right tools and libraries. When it comes to the right tools, Lokalise is perfect for translating text with the least amount of effort required. The process of integrating Lokalise with your application is quite straightforward. Follow the below steps using the PHP translation of the simple application we created with gettext as an example: Get a free trial to start.Then, install the Lokalise CLI on your PC. You can create projects, and upload and download translation files with the use of this CLI.Next, you can move to the “API tokens” section and initiate a new read/write token in your personal profile.Now, you can build a new project and set the base language to English.By clicking on the “More” element, navigate to the Settings section on the project page.Copy in the project ID and the initiated token. Then you can execute the following code: lokalise2 file upload --token --project-id --lang_iso en --fil PATH/TO/PROJECT/PHP_Gettext/locale/en_US/LC_MESSSAGES\messages.po.The above code segment uploads the English translation to Lokalise. To upload more languages, you must execute the above command with the path of relevant portable object files.Now, you can navigate to the ‘Project overview’ page to view all the translation keys and values you have. There, you can make modifications to them as you prefer by editing, deleting, or even adding new ones. You can apply filter options to the keys, which will be really helpful in finding keys that are in different stages of translation.Lastly, you can download the edited translations and execute them using this command: lokalise2 file download --token --project-id --format po --dest PATH/TO/PROJECT/PHP_Gettext/locale.To experience more interesting features, don’t think twice about signing up to Lokalise and integrating it with your applications. SummaryIn this tutorial, we discussed several methods that we can use for PHP translation such as, PHP arrays, PHP Define statements, and Gettext and setlocale methods. Also, we’ve seen that the majority of PHP frameworks support localization. The PHP array and Define statement methods are quite simple and easy to work with. However, as the system grows it gets harder to maintain translation files. Because of that, those two methods are more suitable for small applications. Then we use the Gettext method for PHP translation. But it has the drawbacks of not supporting number, date, or currency formatting. Finally, we discussed the setlocale function which is quite an easy method for performing localization. After all this, you might be interested in using PHP frameworks. In that case, be sure to read our Laravel guide. TutorialsAuthor Shanika Wickramasinghe Shanika is a software engineer by profession and a Graduate in Information Technology. Her fortes are Web and Mobile Development. Shanika considers writing as the best medium to learn and share her knowledge at the same time. She is passionate about everything she does and loves to travel and enjoy nature whenever she takes a break from her busy work schedule. You can connect with her at https://www.linkedin.com/in/shanikawickramasinghe/ Shanika Wickramasinghe Shanika is a software engineer by profession and a Graduate in Information Technology. Her fortes are Web and Mobile Development. Shanika considers writing as the best medium to learn and share her knowledge at the same time. She is passionate about everything she does and loves to travel and enjoy nature whenever she takes a break from her busy work schedule. You can connect with her at https://www.linkedin.com/in/shanikawickramasinghe/
|


【本文地址】